Friday, March 11, 2016

Two More Tried And True Blouses - B5538


Edit: I seem to have resolved the issue - please alert me if you have further trouble. Big thanks to Caro and shams for their help!
Edit: Caro has let me know that pictures are still absent for some viewers, as well as the Google Photo album. I loaded the pictures up on Facebook where no one has had trouble so far. You can search for me as Stephanie Qich or try this link: photo album. I sincerely apologize and thank Caro for her help!

ON EDIT: Blogger has been changing their picture hosting settings, and the pictures did not appear when I first published this post. I believe I have fixed the issue, but if you have any issues you may view the images here: link to album.

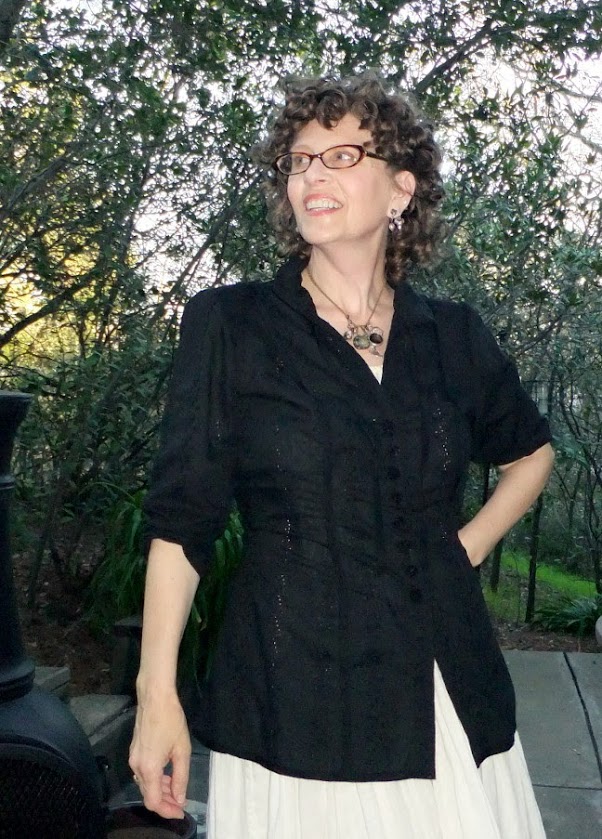
As of two days ago I've made THREE more blouses! This post shows two of them. I used the same Connie Crawford for Butterick design as I did for the black eyelet Ivey Abitz inspired blouse, but made changes to the neckline, length and sleeve.  Adrienne of Wear The Hat has been working on multiples as well - check out her first Chanel style jacket! Absolute drop dead chic worn with jeans, well worth the effort. (Adrienne I had trouble responding to your comment on my last post so wanted to drop it here where i knew you'd see it.) Yes i love my readers!


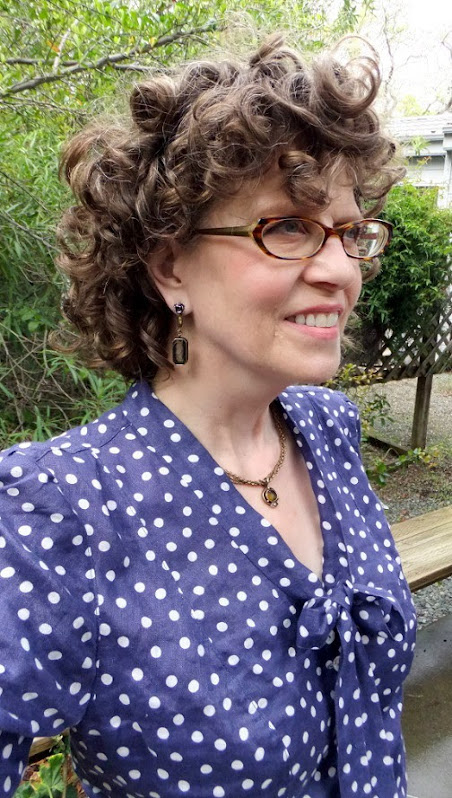
Back to the blouses. I like collars that morph into ties. A few years ago I bought a Babeau pussy bow blouse and the neckline was just about perfect, so I based this neckline on that blouse. I made the collar/tie of a simple long rectangle which finishes at one inch wide, with varying length.

The polka dot blouse uses the sleeve from the original pattern. For the floral blouse, I added gathers and about half an inch to the cap height for a fuller look. These looks are very influenced by seventies French designers such as Yves Saint Laurent, Cacharel, and Chloe. All made very wearable blouses paired with full skirts. Worn with boots or oxfords, the resulting outfits are very practical as well as feminine and, when made up in more high end fabrications, quite luxe.


Which brings me to the focus of this post. These blouses really shine because they fit nicely, have subtle details, and are made with really beautiful garment fabrics. Many of us sew to get the most value for our dollar. As a consequence, we look for fabrics which cost less per yard. Indeed, many gorgeous, artful garments have sprung from humble quilting cottons, denim, and interior decorator specials.

However I encourage you to additionally take a look at the nicer fabrics made specifically for garments. No one would suggest that you neglect your construction skills, or leave off pressing during construction. Similarly, don't let the quality of materials you use fall behind your level of craftswomanship! I don't recommend compulsively buying top dollar, impractical fabrics. Simply make yourself aware, educate your hand and eye to what a really beautifully designed print looks like, how a fine Italian cotton jacquard feels to wear and work with. These experiences will inform your decisions when you shop the discount bin and enable you to find the gems.


I purchased the polka dot linen at Stone Mountain and Daughter in Berkeley, CA. I stop by frequently as I live fairly close by and visit Berkeley a few times monthly. They stock a wide variety of garment fabrics, including wool, knits, silks (prints, stretch, blends), linen. The beauty of shopping in person means I get to contemplate these fabrics for weeks or months before buying. I squeaked this blouse out of the yardage as I'd daydreamed about it so long there was only about one and a half yards left on the bolt!

This linen is finer than most medium weight linen, with fewer nubs as the threads are more regular. The blue, while dark, has a bright life to it, and I love the random placement of the dots. They're a light stone color, easier on my complexion than stark white. Finally, the fibres themselves shine with a lovely soft sheen. This fabric is much nicer than decorator linen when you're looking to make a blouse, as the weave, weight, color and pattern scale are all suited to the body rather than a couch.

I bought the floral cotton jacquard online from Marcy Tilton last summer. The base fabric is a beautiful cotton paisley jacquard. Very light and soft with a wonderful drape. I used a bit of spray starch and it was easy to work with.  I would have fallen for this fabric instantly for the colorful, gorgeously depicted floral print alone - combined with the impeccable base fabric I cannot imagine anything more delicious!


There are many options for buying garment fabrics online and in person today. The trick is to find a store whose aesthetic lies along similar lines to your own. I visit Britex in San Francisco from time to time, and while it is truly a world class fabric store I never find any fabric I want to buy. They buy for someone with more money and more special occasions than I sew for - as intoxicating as the Valentino silk chiffon prints may be, they fit neither my lifestyle nor my budget.

At the Tilton store, it's a different story. While she is known for edgy knits in neutral tones, Marcy Tilton buys fabric in a much wider range. I've been shopping from her long enough to have confidence in the quality of what she offers and to know to keep an eye out for specials and end cuts. There are many online fabric stores, and each has their own aesthetic and specialty. If you cannot find everything you'd like in brick and mortar stores near you, take the time to do some research to see if there's a store or two out there which could be worth your while. When you're getting to know a store, you can order samples if they offer that service, or buy a less expensive piece on sale, special, or end cut. After a couple of orders you should have a better feel for how you like the store without being out too much cash.

I'm not suggesting that everyone immediately drop everything and only buy $200 a yard cashmere for their work clothes. I'm just saying that it's worthwhile to take a look around at some of the nicer and newer stuff now and then. If any of it catches your fancy, and you think you would wear it, see if you can buy some at a reasonable rate. Every now and then take a look to see if there's any new vendors around who carry merchandise that speaks to you. Keeping up to date with what is on offer is an excellent way to keep your sewing fresh, creative and satisfying.


I'm wearing my staple Extasia jewelry here. I've combined a couple of the petite charms with my Benitez Jewelers rose studs to make dangling, "They go but they don't match" earrings. The charm you can see here was a lovely gift from Joanne, who works at the Extasia Outlet in Nevada City, CA. If you're up there be sure to visit the store! They have incredible deals on their outstanding jewelry, from everyday wear to elaborate statement pieces. Joanne herself is delightful and quite knowledgeable on matters esoteric, metaphysical, and philosophical. She is always an intriguing conversationalist and I am happy to have a keepsake from her.

If you know of any great online stores for sewing let us know in the comments!


Tuesday, February 16, 2016

Inspiration: Ivey Abitz


Since the inception of this blog, I've been on the trail of a few Tried And True (TNT) patterns to use for bulking up the closet. Recently I have nailed down another TNT pattern, and this one has some advantages over the rest. It is very easy and quick to construct, fits great, and allows a huge degree of flexibility in design details - you can make any version of sleeve from short to long, and the length of the blouse can vary from hi hip to dress length. Neckline and collar also allow many variations.

This new TNT is Connie Crawford's princess seamed blouse pattern for Butterick, 5538 (also available from Ms. Crawford's site here). This blouse pictured in this post is my second make using this pattern, inspired very heavily by Ivey Abitz designs. Now, you all know I am beyond picky when it comes to my clothes - I find things I would change in the Chanel boutique in Neiman Marcus, for goodness sake! However, Ms. Abitz's designs? I'll take several dozen, happily.

Sadly, my bank account has other ideas....but, in the ultimate ascent of this emotion-sartorial roller coaster ride, yay! I can sew! And Ms. Abitz uses quite economical materials in her designs.


This blouse is not a knock off or attempted copy of any particular design. What I did was prioritize the elements of Ivey Abitz clothing which I loved the most, the parts which really spoke to me. These I combined with what I know works for me in my own closet; in the practical, flattery, and aesthetic sense. This blouse is the result of that process. Here is a link to one of my favorite Ivey Abitz collections, Fall/Winter 2013, for those of you not yet obsessed with her clothing line.

What I wanted to take from the Abitz' designs:

Silhouette: IA offers a unique silhouette among lagenlook designers. She creates a classic fit in the bodice with waist emphasis created thru use of drapey fabrics with ties, buttons, and plackets in back rather than thru lots of darting or princess seams. The skirts are full, usually a-line, with lots of hem emphasis: ruffles, gathers, ruching both vertical and horizontal. I chose to create that silhouette using princess seams thru the shoulders. These seams offer ease of construction and fit, as well as perfect spots for embellishment if desired.

Fabric: luxe natural - cotton, linen, silk, a bit of wool. None of her fabrics are too heavy, all are quite drapey save the handkerchief linens. Colors are subdued, often overdyed, and IA often shows low-contrast prints, ginghams and stripes, as well as embroidered fabrics. No stretch for me, this is what i wear already.

Details: Ivey Abitz offers among the most subtle and small scale of lagenlook details. Signature touches include many small, vintage buttons down the entire front of garments; generously sized collars and cuffs, the aforementioned hem treatments, and small facings and plackets along center fronts.  Raw edges are also pretty common.


I'd purchased 8-10 yards of this beautiful cotton embroidered voile from Stone Mountain and Daughter - 2 yards at regular price, the rest when it went on half off later and i'd seen how well it held up. It would fit in perfectly Chez Abitz. I made a few changes to the Connie Crawford pattern (other than fitting thru the bust and shoulders): I lengthened by 4" and sewed up the side vents, shortened the sleeves and rolled them up to the elbow, and drafted a new collar based on the band from the Folkwear Gibson Girl blouse. I also changed the neckline, bringing it in to center front at the collar from a half inch overlap at the bust level and drafted an inch wide placket for center front.

To finish the princess seams, shoulder seams and hems I used 3/8" wide black rayon petersham ribbon. I sewed the seams inside out, pressed and trimmed, then topstitched the petersham over the allowances. So nice and clean inside, and a subtle embellishment. I handstitched the same ribbon on the neckline to the collar, with ends left hanging free at center front. In a change from the House of Abitz style, I only added buttons from bust level to a bit below waist. I just like this look, and it makes tying blouses at the waist much easier without added bulk from the buttons.


I'm really happy with this blouse and this TNT. My constant closet refrain is: 'I need more everyday clothes!". I cannot accumulate clothing if I'm reinventing the wheel every time I make a garment. This pattern is easy to make, easy to adapt for a variety of looks, easy to wear. It looks put together over a skirt, pants, or a slip dress which I appreciate when it is too warm for a jacket.

It's a bit strange when my style is known for being a bit on the eccentric side to find such a classic design works wonderfully in my closet. It goes to show that there are many many design decisions in any garment, and knowing your own signature style elements pays off big time. Now I am off to make version the third, and work on a post about the first version - a polka dotted pussybow.


Monday, August 31, 2015

Corset Style Top


I made a little top. Long time readers (hugs all round!) have heard me complain incessantly about the travails of looking stylish and feeling comfortable in temperatures above 90F. Follow this link to my second post ever on exactly this topic. Living on the border between the San Francisco Bay Area and the Great Valley, temperatures this hot may show up a good six months of the year.


Around the time I started The Dashing Eccentric I started to make a few little 'cami tops'. Sleeveless, cotton or linen, with styling bringing to mind the corset covers of the Victorian and Edwardian era, my cami tops made up using little fabric and time whilst broadcasting my own personal style no matter how high the mercury climbed.

I've never been without these style essentials since. However, this spring I had to admit that this part of my wardrobe needed a serious overhaul. My remaining cami-tops were threadbare in places where an artful applique or embroidered fillip would only be appropriate in certain Vegas venues. What's more, I hankered for a more modern, sophisticated take on this garment.


Designing a wardrobe workhorse garment which one hopes to become a TNT can be a long process. First, I had to determine my criteria - what functional and stylistic characteristics would I prioritize?

I settled on sleeveless, moderate neckline/armscye, style lines/decorative possibilities hearkening back to the corset-cover inspiration, seamlines offering exacting fit around the bust and shoulders, and clean finish of interior and edges. Based on this list I decided to go with princess seams and a yoke.


I liked the idea of a yoke for three reasons. It allowed seaming which mocked the top of a corset and allowed for closer fitting through the high bust and shoulders. This seaming could be done traditionally, seam allowances turned to the inside and very subtle, or could be accented with tone-on-tone or contrasting trims. In this instance i used self made bias binding in a low-contrast print.

Interior view
The third reason I chose to go with a yoke was so I could encase all of the yoke's edges and seam allowances. Above you can see that i sewed the necklines and armscyes of the yoke to a facing, then turned it inside. On the inside of the garment, I pressed up the facing's seam allowances along the bottom edge of the yoke and hand stitched it to the interior seam allowances to finish. You can see it makes for a very clean interior - comfortable as well.


Given this decision, I looked at the commercial patterns available to see if I could find one from a well-reviewed designer with similar lines. I chose Lisette's 6183 design for Butterick. The fit was nice and the pieces went together well, and the pattern includes separate pieces for A-D cup sizes - a very nice feature in any bodice. The design lines weren't so far away from my vision so as to make drafting onerous, though I did make substantial changes. I developed completely different construction methods.

For this garment I chose to use silk organza for the yoke facing. This linen is a bit sheer, so two layers of the linen would have made the yoke appear more opaque than the 'corset' area of the top. This seemed opposite of the effect I wanted of a more substantial 'corset' with flimsier 'yoke'. Since the organza didn't add any visual weight I went with that instead of the linen.


As much as I love silk organza, it is a pest to work with! Long, strong threads grabbing everything, everywhere! Fortunately my choice worked very well for the visual effect and it is nice on the skin as well. The end product was worth the effort. If I'd done all that fussing and it hadn't turned out well, I am sure you would have heard my cussing around the world!

Using bias bindings along the seamlines had more than a decorative purpose. I stitched the vertical seams wrong sides together, pressed and trimmed the seam allowances to about 1/4". I then applied the bias strips on the right side of the garment, topstitching on both edges of the bias strips, thus encasing the raw edges.


Figuring out the order of construction on this garment, and then working with the silk organza facing was certainly fiddly!   However, the end effect is wonderful. I will be looking for more opportunities to use the technique for seam finishes in future. I am scheming another make of this top in black with a white with black cotton ribbon instead of the bias binding (the curves are gentle enough that it should work without the flexibility of the bias). Using the same color but with a different texture - say, satin bias on linen - would yield a subtle, luxe result.


In order to break up the neckline a bit and allow increased ventilation, I put a split in the yoke at the top center front instead of continuing buttons all the way up. I used a combination of dark grey and clear buttons from the stash. Inside, I used one at the center back of the yoke instead of a label, with a bit of the bias binding underneath clipped like a ribbon.


I put a lot of thinking, scheming, testing, and flat out futzing into developing this top - and it was worth it! I look forward to making up more of these tops in neutrals as well as one floral which is drawing my attention in this direction...and I am excited to lengthen this top into a dress as well. Making this design in a dark, clear blue with ivory polka dots in a swingy silk crepe de chine, hitting a bit below mid calf would create a dress embodying easy French chic.

How did you come to your own TNTs? Did it involve lots of planning and experimenting or did it fall into your lap? Let us know!

Saturday, August 22, 2015

"Calder" Cirque Dress - Marcy Tilton for Vogue 9112

Ladies, if you have scrumptious gams this dress (at original length) is for YOU!

I made this Cirque dress before the one I showed you back in spring, but wanted to get pictures which showed it to full advantage before sharing it with you here. A couple of weeks ago i ran across this fantastic mural in an out of the way, industrial-type area of Berkeley. I thought the cerulean blues would be fantastic against the burnt oranges in this print, but the location didn't lend itself to my usual self-portraiture. Happily my dad agreed to take some pictures of me with his DSLR camera and here we are!


I bought this fabric from Marcy Tilton's online store around 18 months ago. As soon as i saw it i loved it - the style recalls a dear artist friend of mine and the warm colors are my favorites to wear. I had no firm plans for what to DO with it, and this fabric languished in stash until i saw Vogue 9112. Instantly i loved that dress and i knew what i was waiting for on this fabric!

But I had a couple of aspects I wanted to think through to make this dress fantastic. I am 5'5", 5;6" with an Hourglass/Inverted Triangle figure. This dress has a high collar - in fact the collar is lots of what attracts me to this design - but with no design lines breaking up the upper bodice area. So I was a little leery about looking overly formidable. 

the lovely and formidable Margaret Dumont courtesy jimbolist 
I could have taken the 'traditional' approach and altered this dress to create a closure up the center front - but this would destroy the wonderful collar, and i really loved the simplicity and ease of the pop-it-on design. That ease of dressing is especially appealing in the heat of summer. So I decided to take a closer look at the design and all the techniques I've learned to tone down a pair of big square shoulders and large bust to see if I could make it work.


As it happens, the design is more IT friendly than one would think at first glance - the wide, open neckline and multiple vertical/diagonal lines of the collar help to break up a wide shoulder line. The shoulder seams are again quite nicely designed - wide enough for modesty and covering a bra, but slim enough to again break up any linebacker shoulders.

You may stand the collar up or fold it down. Allowing it to crumple a bit softens the lines around the shoulders. And you can create the classic vee neckline used to break up a generous bust by wearing a longer necklace or two.

I edged the collar with topstitched self-made bias tape to show more of the print

When it came to constructing the dress, I chose a drapey cotton lawn and cut enough ease at the bust so that the dress would drape over the individual breasts instead of pulling taught across the bust (i am wearing a silk camisole under the dress here, without which the drape is more pronounced). I've found this helps to 'break up' the upper body. I placed the print asymmetrically across the bust for the same reason - that sequence of yellow and orange circles at center front would have been a target! 

Continuing this approach, I placed the print asymmetrically over the dress as a whole. As my aesthetic generally is more low-contrast and delicate, with many curvy lines in face and hair I placed the more delicate, low contrast areas of the print in the upper third of the dress, closer to my face.

I concentrated the bolder, darker, higher contrast, 'heavier' areas of the print near the hem to anchor the dress visually and to get the impact of these parts of the print without feeling like I was being overwhelmed.


You'll notice that I relied on several different techniques to break up what could have been a formidable bodice - color and light/dark placement in the bodice as well as the overall garment, varying the weight of the lines used in the print over the garment, styling with necklaces, and last but not least Marcy Tilton's masterful use of subtly flattering lines in the original dress design.

I find that using several techniques, each applied with a light hand, creates a more effective and flattering end result when trying to direct attention towards or away from a particular aspect of one's physical being. Wearing a figure-hugging black dress with a dramatic decolletage will also break up the bust, but is not appropriate for everyday and can get a bit boring.  

I am very glad I chose to ignore 'traditional flattery' rules and tackle this design! Not only do i have two great summer dresses (with more to come) but I put myself through my paces creating visual balance in these garments. This experience clarified the process for me, and I hope this knowledge will be useful to my readers as well.

eagle-eyes will spot a high-heeled shoe, cassette audio tape, flaming binocular, old school teevee aerial....
This view shows the wonderful, asymmetrical swoop of the hem which makes this dress so whimsical and fun to wear. As I wanted to wear this piece as a dress, not so much as a tunic, I added 4" at the hem. This alteration is simple to do, and accents the indentation on the lower side hem.

Believe it or not, this dress is a big sentimental piece for me. I have a dear friend of many years who is an artist often working in the graffiti style. We spent many wonderful hours visiting museums together. One of his favorite artists is Alexander Calder, and we saw Calder's circus (made for his daughter) at the Berkeley Art Museum a few times together. So between the graffiti, the color palette, and the 'cirques' of this dress, it reminds me so much of my wonderful friend Shawn. I realize when you hear 'sentimental dressing' one expects old fashioned Victorian frills - this goes to show you just never know!

What are your most unexpected sentimental garments? Let us know in the comments!

Photography by Marvin Quick. 

Friday, August 14, 2015

A Blouse for Charming Hummingbirds - B4985


I made this blouse a couple of months ago, but it has been harder to photograph than the Loch Ness Monster and Bigfoot combined! Poor lighting conditions, gadget failure, even buttoning up the blouse wrong all plagued your humble photographess. I've finally managed some decent pictures, which makes me very happy as i really love this blouse and want to share it with you.

continuing the bird theme, worn with cuckoo clock pendant
I've made this pattern up several times before. The addition of princess seams below an empire waist seamline makes fitting a large bust/smaller ribcage and waist really easy and the many small pieces offer a nice canvas to showcase this gorgeous border print cotton lawn from Marcy Tilton.

Hummingbird Blouse layered over Tina Givens' Briare slip and self-drafted petticoat
With no sleeves and a fine but very breathable cotton fabric, this blouse is perfect for wearing in the heat. The bright colors and incredibly detailed floral print charm just about everyone. Finding just the right buttons for this blouse could have been a problem, but i used real shell ones i cut off of a old men's dress shirt. I turned them around, revealing the varied shell patterns.


Eileen Fisher has been creating a useful resource at their site on how to take care of your clothes for the long haul. This project is part of their philosophy of being respectful of the resources used to make their clothing. I enjoyed this video on how to sew on a button and used the same technique on this blouse. The little thread shanks give the buttons a bit of dangling movement.


I used french seams all through, enclosed the button plackets, and applied bias binding on the armscyes. The more i sew and wear my own garments, the more i appreciate a beautiful interior finish. The experience of wearing a nicely finished item is so much more comfortable, luxurious and sensual than floppy, scratchy ready to wear.

Combined with beautiful fabric and your desired fit, this type of finish really changes the way you live in your clothes. It can't compare to even the best of ready to wear because RTW manufacturers will not fit so exactly to your unique figure and do not regularly use the same quality of fabric and such time-consuming techniques. This level of luxury lies behind the passion of many seamsters.


A pattern which one knows inside and out, using it many times, is called a TNT - for "Tried N True". While you see the acronym pretty frequently in the online sewing world , you don't see much practical demonstration of the ways in which you can really stretch a TNT and put it through its paces in creating your wardrobe.


Erin of Seamstress Erin released a well-reviewed swimming pattern this summer. In conjunction, she has published a number of articles on ways to use this one pattern to make your own undiescreate a tankini, hack a high waist swim bottom or undies, how to add a little skirt, and how to add a high waist with twists. Whew! What i especially like about this series is how it shows what you can do beyond just changing out the sleeves or leaving off a collar by using some simple drafting skills and your creative vision. Really worth checking out for inspiration - and to see the gorgeous fabrics she uses.

Do any of you have TNT patterns? Or, even more important, what are the pieces in your wardrobe which are delightful enough to charm a hummingbird? Let us know in the comments!

Thursday, August 6, 2015

Ancestress of Style - Lauren McIntosh


We all have our own style icons. While some of them are constantly at front of mind - Isak Dinesen, Amelia Earhardt - others work their magic in our subconscious for decades until one day they decide to stroll out into the spotlight and take a bow.

Most of you are quite familiar with my love affair with beige. Beige - the perfect low contrast neutral to go with my low contrast coloring, beige keeps me from feeling overwhelmed when i pile on the details or play with an outsized silhouette.


Which is why i felt perplexed at my choice of daily uniform. The last six months have seen me ever more reliant on uniform dressing. Nine days out of ten I'm in a dress or a full skirt and white linen blouse. Even better if it is a full, black skirt. With a white blouse.

Black and white. While this combo indeed comprises neutrals, it is the quintessential high contrast look. Why did i love wearing it so much, why did it feel so me? I knew not why, but continued sporting this combo in hopes it would trigger some insight.

It didn't. What did was a post by Marcy Tilton, sharing with her facebook readers her love of designer Carolyn Quartermaine via a little video. While the focus of the video was Carolyn Quartermaine's promotion of toile de jouy, the calligraphy Ms. Quartermaine favored reminded me of Lauren McIntosh's own artwork. Lauren McIntosh co-owns Berkeley boutique Tail of the Yak with fellow artist Alice Erb. I of course remarked that Lauren McIntosh's personal style was also something to behold.

Lauren McIntosh with her artwork via hat designer Momoca's blog
While searching for a picture or two with which to illustrate my  point, my abiding love of the ensemble black and white stared me square in the face. The pictures of Ms. McIntosh i found online, while scarce, solved the mystery of my black and white love affair in an instant.

If you walked into Tail of the Yak today, you would be awed by the exquisite taste in everything from water glasses, to Victorian-era mourning jewelry, to hand-cut garlands and 1920’s era French ribbons by the yard. But you would not be shocked with a through the looking glass punch to the gut – because Tail of the Yak has been so influential and copied through the decades.


Not so in the early 1980’s. I grew up in Castro Valley, half an hour south of Berkeley to which we’d go on the weekends. I found being so out of place at ‘home’, then 'just another weirdo' a few miles distant to be more comforting than strange.  And in Tail of the Yak, I got a glimpse of people living the type of life in which my talents and preferences would at least be accepted, maybe even admired.

The idea of living with people who didn’t actively scorn me was arresting enough, but what I really loved about Tail of the Yak was looking at everything. I loved the taste and aesthetic and thirstily drank it in.

from Remodelista: Lauren McIntosh, Artist Doyenne of  Berkeley
On the best visits Lauren McIntosh would be working in the shop. She’s strikingly beautiful, but more than that I loved her outfits. When first I haunted the store, she wore crisp, full black cotton skirts with white cotton petticoats, black leather booties, and white or black cotton blouse. She braided her long black hair and sometimes topped it all off with a straw hat painted black. 

jewelry influenced by Tail of the Yak and Ms. MacIntosh herself
This stark ensemble created the perfect setting to showcase her incredible collection of antique (not vintage – antique) European and Mexican jewelry. Pearls! Cameos! Rose cut diamonds! Antique paste! Earrings from the Mexican jewelers who sold to Frida Khalo, in business since the days of Spanish colonialism (I have a pair myself – thank you mom)!

photo from the Real Isabelle Allende's blog
I haven't the words to convey the atmosphere of Tail of the Yak. I did find a few pictures which may give you a taste of it - here is Isabelle Allende sprucing up Ms. Erb and McIntosh's macquillage for a photoshoot, later published in American Craft magazine. That's Tail of the Yak in a nutshell.

"6 places to check out in the Elmwood" from sfgate
Intoxicating, and it seemed at the time, utterly beyond my reach. I didn’t have the budget of the target customer, so never got to know anyone with the store (aside from a few conversations with the ethereally delightful Alice Erb, partner in Tail of the Yak and the gentlest, sweetest of souls). So I consciously put aside the idea of being influenced by that milieu.

Happily, my unconscious was having none of that! I find it so wonderful that our subrosa selves can take inspiration from people and places no matter what 'we' make up our 'minds' to do or not. In this instance certainly my subconscious had very strict and correct views on the matter, and i am grateful to it for showing more common sense than 'me' up here in the brain!


I made this double-layered skirt as part of a Lagenlook Sew Along organized by Garden Girl (Rene) on the Stitcher's Guild sewing forum. These sew alongs started in January and have been quite active - check out the threads for a ton of eye candy, inspiration, and helpful advice. For this double-layered skirt i chose 100% cotton lawn, embroidered in a kind of eyelet/wallpaper stripe. It is easy to sew and very comfortable to wear. (Click here to see some photos showing the skirt details more clearly.)


I bought the fabric at Stone Mountain and Daughter - at $9 a 54" wide yard, an excellent value. Even more as it has been wearing quite well, no pilling on the embroidery, twisting, etc. I had been kicking myself for not buying more, when last Saturday i went upstairs at Stone Mountain to find the same fabric on sale for half off - I snapped up four yards to make a dress. Thank you fabric fairies!

Do any of you want to take a guess at what style icons lurk in your own subconscious, working patiently while awaiting the right moment to burst upon your awareness? Maybe you've had a similar realization? Please share!

Saturday, July 25, 2015

Tina Givens Zelda Slipdress - Luxe in Silk


This make of Tina Givens' Zelda Slip Dress embodies slow sewing.  To begin, I'd had the fabric for over a year and a half before i cut into it. I also decided to accent the dress with some lace. I found a beautiful lace, which only came in white.  I knew from experience that the lace's rayon/cotton blend takes dye beautifully, so I used RIT dye in navy to create something more in line with the look i had in mind.  Dyeing took some time, as did stabilizing the silk crepe de chine at hem, neck and arm openings with spray starch. Cutting my own bias trim (of the same stretch denim i used for my Marcy Tilton V8876 frock coat) took more labor than buying pre-made. Hand stitching the bias binding also added minutes and hours. As did arranging all those gathers on the ruffles.


But what really pushed this one over the slow sewing edge were the changes i made after the dress was nominally complete.

The wrap blouse is NoaNoa, a gift from gorgeously generous Sheila of Ephemera <3 a="">

As soon as i finished this dress i loved wearing it. I bought the fabric at Stone Mountain and Daughter and it is simply luscious. Heavy without feeling weighed down, delicious soft soft surface, incredible drape and it turns out it is virtually fray proof. Never leave that store without going upstairs to check out the silk on sale!  The sinuous motion of the hem mesmerized me while simply walking around the house. And it's so practical for my life - i can wear it as a nightgown, then toss on a jacket or cardigan and be perfectly presentable to drop Mr. E off at the transit center for his early morning commute.

fairly swank for a 'just rolled out of bed' look if i say so meself

However, as close as this dress was to perfect, i had a couple of thoughts on how to improve it. The whole line is so dramatic, but the color was 'meh'. I wanted to see it in an equally dramatic hue, and loved the navy of the lace. That was an easy choice. Dyeing - easy, but time-consuming.

the original shorter, less ruffly, lighter version

The other thing i didn't like was the length in front. My knees felt like they were kind of poking out at center front, and that is not a spot i like my hems to hit generally. (That's why i'm wearing leggings in the pre-navy pictures.) I had a fair amount of fabric left after the first round of slip-making. When i measured this remnant i had just enough to add another ruffle at 6 1/2", behind the original 3" ruffle.

So i set to. As this silk has a fairly 'bouncey' reaction to being gathered (it poofs out instead of falling straight down) i made random hand-pleats for the added ruffle, instead of running stitches and gathering as i did for the original row of ruffles. Seeing as i was there hand pleating already, i sewed the ruffle on by hand as well. It took about an hour, but i like this length so much better than the shorter version.


How much that three and a half inch increase affected my reaction to this dress struck me. It's such a small amount compared to the height of my body, yet made all the difference - like letting out a too-long held breath. I did a bit of calculating, of which accuracy i am not certain, and it looks like three inches is just under 2% of my height (five feet six inches).

Which leads me to posit that the difference between looking good and having fabulously killer style is that last two percent. Any thoughts?


The one part of this dress i'm not so hot on is the neckline. It is fine, just not as excellent as the hem. I'm mulling over converting the bodice part to a strappy cami type of affair, which would be less obtrusive under layering garments as well as cooler and more flattering to wear on it's own. This operation could be trickier than it would seem upon first glance as Tina Givens' wonderful hemlines derive their shapes in part from the length added by the trapeze-shaped side seams.

here you can get a feel for the shape of this dress
My favorite part of this dress is the hem. It's not at all complicated, a very flat curve along the back and an upside down "U" sweep in the front. Somehow, these lines and the way they intersect constantly surprise with new shapes. I'm particularly enamored of the squareish garland-bit which hangs off the corners. Great, original looks from every angle - not a common achievement! No wonder this dress is so popular - it also flatters curvy women outrageously.


Is going through so much fuss worth it when you end up with something so scandalously luxurious and practical? I always answer "Yes!!" which is why i remain on the slow sewing team.  Are you on team slow sewing, or would you rather watch us from the sidelines?